Australian FTTP via Telstra not connecting to FortiGate

We recently had a customer take advantage of a free upgrade from FTTN (Fibre to the Node) to FTTP (Fibre to the Premise) for their NBN (National Broadband Network) service. However during cut-over the FortiGate wasn’t picking up connectivity on the WAN port, this had the on-site guy stumped for 10 minutes until we jumped on and took a look. In HFC days, you’d sometimes have to “spoof” the MAC address to get it working – but in this case it was something else… Ethernet auto-negotiate.

We hard-coded the WAN port to 100 full duplex and it kicked in like a charm. The following command lets you edit an interface and set the speed accordingly.

edit WAN1
set speed 100full
end

While it’s not something I’ve experienced with Enterprise Ethernet installations, this also rings true in certain cases of fibre installs we would sometimes see customer NTDs or NTU (such as Cisco or MRV) also not connect for similar reasons, so liasing with the ISP we’d ensure both sides of the cable are set to the same setting.
Fix FortiGate HA out of sync

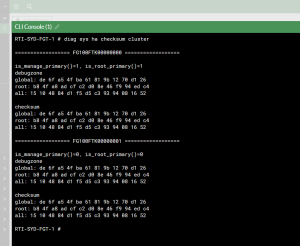
Sometimes after performing a Firmware upgrade on FortiGate HA pairs, I find that after sometime the cluster still stays out of sync and won’t synchronise. I usually find this is because the checksums of the config files on each or some members are different. To quickly check if this is the case, fire up the CLI and run the following command that will output the HA checksum.
# diag sys ha checksum cluster
If the output don’t match and we’re happy with the configuration of the primary we can issue a checksum recalculate by issuing the following command
# diag sys ha checksym recalculate
Just entering the command without options recalculates all checksums. You can specify a VDOM name to just recalculate the checksums for that VDOM.

How to spoof or mimic a hardware or MAC Address of another device on an interface on a FortiGate

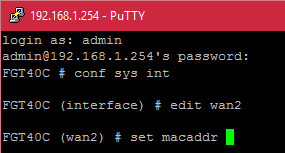
I was recently out at a client and they were in the process of getting another link installed, which happened to be Cable internet which they were using for redundancy.  We put their cable modem in Bridge mode but the connection wasn’t coming up after connecting everything up.  Most cable providers authenticate with certificates and the hardware address of the router so this made me thinking that we needed to make their provider think the FortiGate was their original modem.  So firing up an SSH session I logged in and issued the following commands;

FGT40C # config system interface
FGT40C (interface) # edit wan2
FGT40C (wan2) # set macaddr xx:xx:xx:xx:xx:xx
FGT40C (interface) # end

Now you will want to replace the interface, in this case wan2 with your interface and the mac address with the hardware address you want to spoof or mimic.

I gave the cable modem a power cycle for good measure and the connection came up.

Configure a login banner or disclaimer on a FortiGate for Terminal and HTTP admin logins

If like me you work in an environment where you have people who are attempting to circumvent your network security it helps to have a banner or disclaimer to warn them about the trouble they will get into if they’re caught. By default when you attempt to login to a FortiGate there is no warning message or login banner.

To enable the banner or disclaimer on a FortiGate (there is both a pre and post login disclaimer you can use) we firstly need to log into the CLI of the FortiGate and enter the following commands to enable the banner. You can substitute pre with post if you wish;

FG621B # config system global
FG621B (global) # set pre-login-banner enable
FG621B (global) # end

Now log into the web ui of FortiOS and go into System > Config > Replacement Messages once there we need to switch to the extended view and the login banners should be at the top of the list, you can edit the default message if you wish, once done click on Save.

Once you try and get the FortiGate via Terminal or Web Management you should get prompted with the Disclaimer message.