Time Hierarchy in Active Directory

Time is more critical in Active Directory than many admins realise. Time inaccuracy can cause logs to mismatch or things like license failures for anything with DRM. Larger time differences can begin to cause authentication failures since Keberos relies on accurate time or affect replication health.

By default, all AD member machines synchronise with any available domain controller, and in turn domain controllers will synchronise with the PDC Emulator of that domain. This article by Microsoft explains most of the above along with a similar overview of setting up Time Sync correctly. Whenever doing a large audit for an on-premise AD customer or have the chance to build out a new AD Forest, we always recommend ensuring that the PDC gets it’s time from an accurate external time source, and I’ll usually go as far as setting up a set and forget GPO to manage this to ensure newer PDCs get this treatment.

To ensure we target only our PDC emulator we can create a WMI filter that we can use against the Group Policy object that we’ll be creating shortly. The following WMI query will filter a PDC Emulator in an AD environment

select * from Win32_ComputerSystem where DomainRole = 5

Next step is to create the Group Policy Object, in this case I’ve create a PDC External Time Sync GPO, open it up and go to Computer Configuration > Policies > Administrative Templates > System > Windows Time Service > Time Providers. We now want to configure the following settings as follows

Set Configure Windows NTP Client to Enabled
For NtpServer enter your NTP servers details: ntp.nml.csiro.au,0x9 ntp.monash.edu,0xa
For Type set to NTP
Set Enable Windows NTP Client to Enabled
Set Enable Windows NTP Server to Enabled

It’s also important to ensure you’re specifying the correct flags to ensure reliable time, with my example I’ve specified a primary and secondary time source to minimise any potential drift when Windows decides to synchronise. By making the primary NTP server flag 0x9, we made it “Client 0x08 + SpecialInterval 0x01” and as for the second NTP time server.
By making the secondary NTP peer flag 0xa, we made it “0x08 Client + 0x02 UseAsFallbackOnly”.The following options are available to use with w32tm.

0x01 SpecialInterval
0x02 UseAsFallbackOnly 
0x04 SymmatricActive 
0x08 Client

The final GPO should look something like this with the WMI filter attached an linked to an OU with your DCs.

Since I’m based in Australia I’ll tend to use au.pool.ntp.org or use the Australian Governments NMI NTP service, which requires you to get your public IP whitelisted but is unlikely to be poisoned or attacked unlike the NTP Pool project.

Hope that helps.

Hide the Bing button in Edge

I’m not a fan of the Bing button that now appears in Edge. Microsoft seem to have rushed it out as there isn’t an easy way to remove it. We’ll do this via a registry key (that can also be deployed via Group Policy)

Close out of Microsoft Edge completely and open the Registry Editor and navigate to HKEY_LOCAL_MACHINE\SOFTWARE\Policies\Microsoft. Right-click on the Microsoft folder and select New > Key from the context menu to create a new Key and name it Edge. Enter the Edge folder and then right-click an empty area on the right and choose New> Dword (32-bit) value, name this value HubsSidebarEnabled . Its default value is 0, which is correct. Now close Regedit and open Microsoft Edge again and navigate to edge://policy and click on the Reload Policies button that appears – the button should disappear.

As of Edge version 114 (Edge Dev Channel) users can do this via Edge settings and navigate to Sidebar > App and notification settings > Discover and then Disable the Show Discover toggle at the top.

Enabling BitLocker with Group Policy and backing up Existing BitLocker recovery keys to Active Directory

So getting BitLocker enabled in an Active Directory environment is fairly painless and helps to get your end user devices more Secure.  I’ll outline the steps you need to take to enable it as well as get the recovery keys stored in Active Directory.  I’ll also dive into replicating this setup on Azure AD/Intune in a future post.

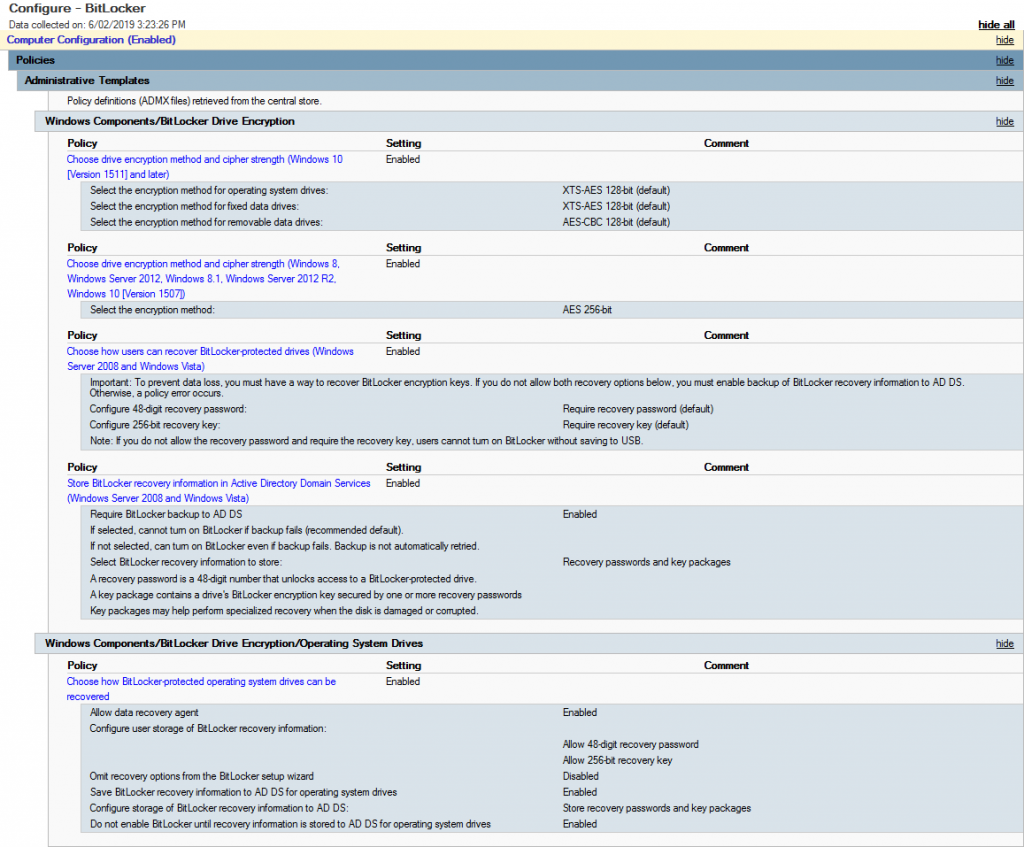
First thing is to create a new GPO (i.e. Configure – BitLocker) – Edit it and navigate to Policies > Administrative Templates > Windows Components > BitLocker Drive Encryption. Enable the following Options:

  • Choose drive encryption method and cipher strength (Windows 10 Version 1511 and later)
  • Choose drive encryption method and cipher strength (Server 2012, Win 8.1 etc…)
  • Choose how users can recover BitLocker protected drives
  • Store BitLocker recovery information in Active Directory Domain Services

Then go down one folder into Operating System Drives and enable the following:

  • Choose how BitLocker protected operationg system drives can be recovered

Once you’ve set this all up, it should look something similar to the image below.

Now target the GPO to some machines and if you’re running 1809 (from what I’ve discovered so far) or later you’ll notice them start the BitLocker process to encrypt automatically.  If not then you may need to check and ensure the TPM is enabled for the device (as we haven’t specified to encrypt devices without a TPM in this case).

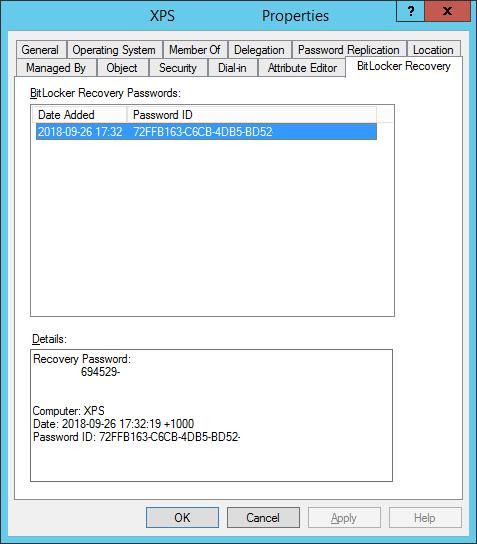
What happens if you have already enabled BitLocker but now want to store the recovery keys in Active Directory? With this GPO set it will allow windows to write the recovery key to AD however we need to use the manage-bde utility, that is a command based utility that can be used to configure BitLocker

manage-bde -protectors -get c:
for /f "skip=4 tokens=2 delims=:" %%g in ('"manage-bde -protectors -get c:"') do set MyKey=%%g
echo %MyKey%
manage-bde -protectors -adbackup c: -id%MyKey%

I saved that as a batch file and ran that on the machines that had already been encrypted prior to rolling out the GPO.  Once run, it escrows the key into Active Directory.

The last bit you will need to do so you can actually see the keys in the Properties tab or via the Search function in Active Directory Users and Computers, ensure that the BitLocker RSAT is enabled in Server Features and Roles.

Deploy Firefox in the Enterprise with uBlock Origin, HTTPS Everywhere and Privacy Badger using Group Policy

So we’ve been deploying Firefox for quite a while pretty much everywhere we can however, only recently have we started standardising the deployments across the organisation’s that we manage. We’ve deployed Internal Root CAs using the CCK2 method to improve our user experience with Deep Packet SSL inspection however setting up configurations and extensions and having that consistent was a challenge. Recently I learnt that Mozilla begun developing Group Policy Objects not long ago and that now allows for enterprise management straight into Firefox without the fuss. In this article I’ll go through setting up uBlock Origin, HTTPS Everywhere and Privacy Badger which are our go to Extensions for end-user protection.

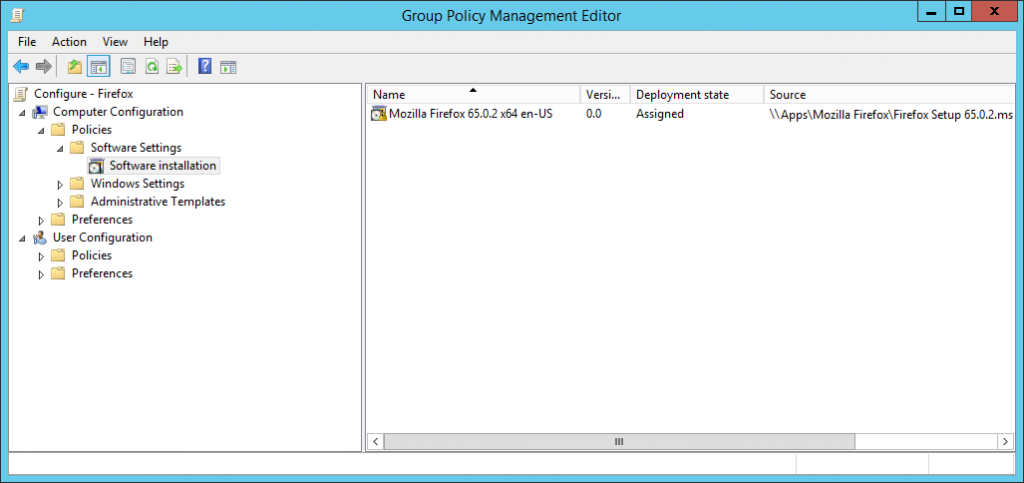
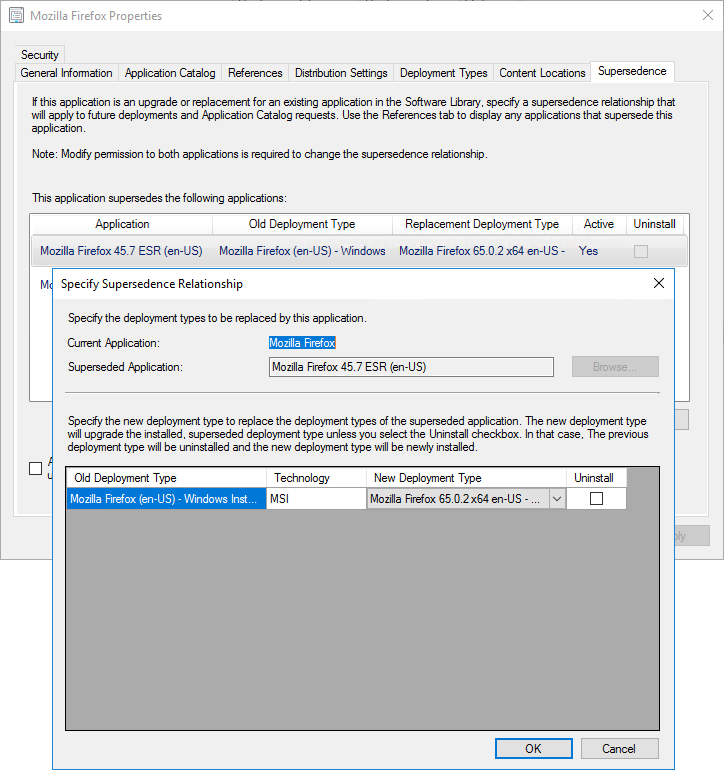
To deploy Firefox (or any windows application), you generally want to use an MSI based installer (for better control and management). Mozilla have now been building them for a shot while via their Enterprise Deployment Support page for beta and standard releases. If you are after the Extended Support Release (ESR), visit the FrontMotion download page (they also offer a number of other services such as a custom packager). In a managed environment you’d either use Group Policy to deploy software or System Center Configuration Manager or some other form of MDM (ala InTune). The MSI should be in a network share accessible by all machines, you would then be imported either into Policies > Software Settings > Software installation for Group Policy (then Right-Click, New > Package) or an Application under the Software Library for Config Manager and pushed out. There are much better guides than what I can fit in here so please Google if you’re unsure. In our case, I used Config Manager and since we’re upgrading and I’ve setup a Supersedence rule like below.

Once Firefox is being deployed we need to get these extensions onto the machines, so the first part is getting the URLs of the extensions you wish to deploy. Visit the add-on store and start searching for what you’re after. For our example, as mentioned we will be installing uBlock Origin, Privacy Badger and HTTPS everywhere. When you are at the add-on page, right-click on the Add to Firefox button and select Copy Link Location and save that for later. Once you have your list of Extensions it should look like something similar to the below (I’ve removed the tracking string at the end).

https://addons.mozilla.org/firefox/downloads/file/1672871/ublock_origin-1.18.4-an+fx.xpi
https://addons.mozilla.org/firefox/downloads/file/1688114/privacy_badger-2019.2.19-an+fx.xpi
https://addons.mozilla.org/firefox/downloads/file/1669416/https_everywhere-2019.1.31-an+fx.xpi

Next is to get the Group Policy Definitions from Mozilla and load them onto your Active Directory Group Policy. I’d highly recommend you have a Group Policy Central Store setup as it makes managing this stuff a whole lot easier. Download the latest version or ones that match your deployment of Firefox from the Mozilla GitHub Releases page, unzip and then copy across those files to the Group Policy Central Store or required location. Now the fun part.

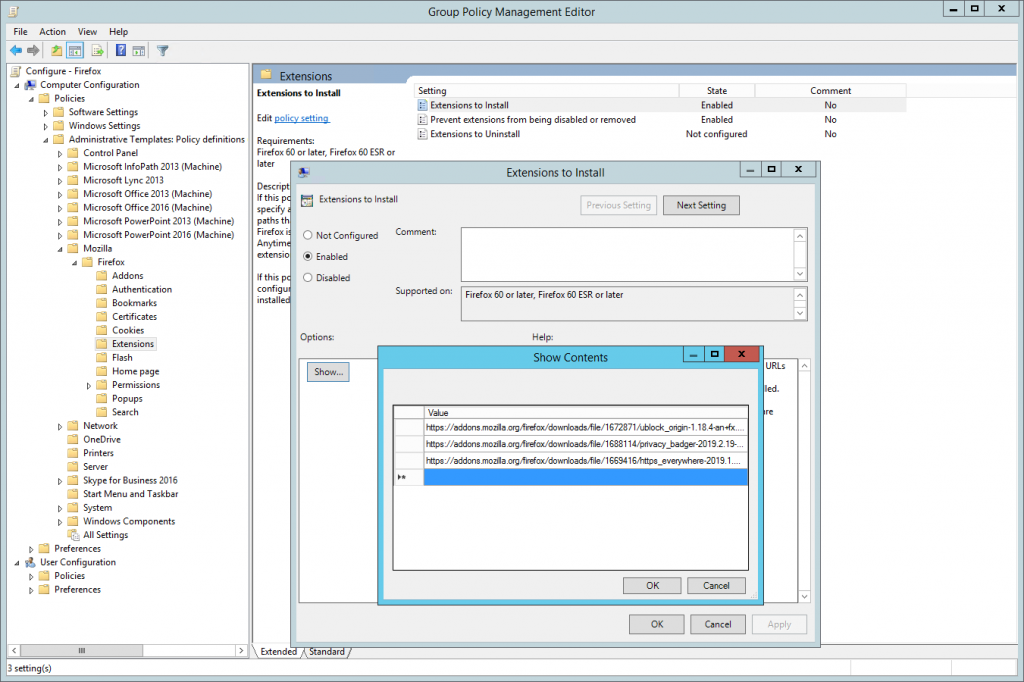
Create a new Group Policy Object, in my case Configure – Firefox and then open it up, and navigate to the following policy branch; Computer Configuration > Policies > Administrative Templates> Mozilla > Firefox > Extensions. Here we will be enabling Extensions to Install. Using the list we compiled earlier, enter the URLs one by one into the list so it will look like something similar to the below.

The next step I’d recommend, is we want to stop or prevent our end users from being able to remove these extensions/protections. To do this we need to get the Extension IDs, so fire up Firefox and install the list of Extensions we compiled earlier (if you didn’t already for testing). Now the easiest way I’ve found of getting the Extension IDs is to use the in-built memory profiler of Firefox. In the address bar enter about:memory and once it loads under Show memory reports group, click Measure. Do a search for Extensions and you’ll get to a list of all currently running extensions. Now extract everything for the id key (in this case a GUID but can be text as well);

Extension(id={d634138d-c276-4fc8-924b-40a0ea21d284}, name="1Password X – Password Manager", baseURL=moz-extension://31872614-f67c-4cda-84e4-18c0515c8b48/

The above is an example of what you’ll find in the list (using 1Password). Below is what we’ll be entering into the Prevent Extensions from being disabled or removed based on our setup so far – with the last line belonging to Privacy Badger.

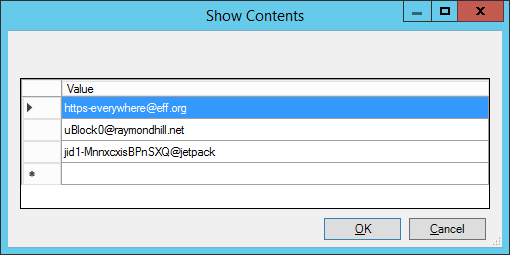
[email protected]
[email protected]
jid1-MnnxcxisBPnSXQ@jetpack

Now that we have the list of Extension IDs we want to enter these into the Prevent extensions from being disabled or removed Group Policy setting located in the same branch as Extensions to Install. Again, enter them into the list one by one until you have something similar

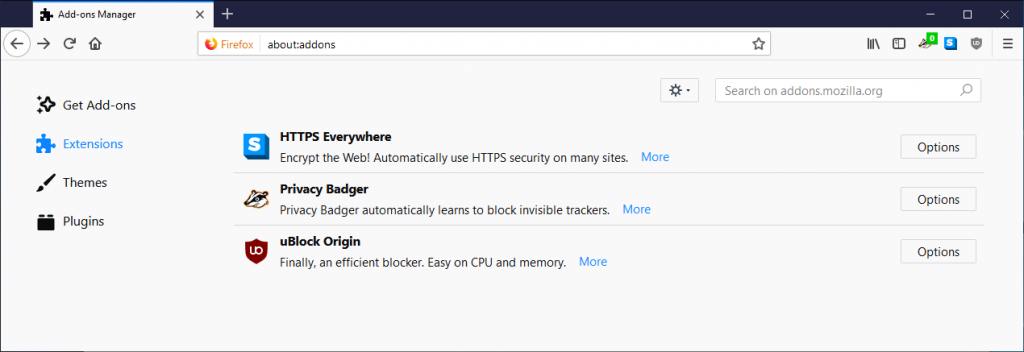
Once that is configured, apply the Group Policy Object to your Test Machines preferably with Mozilla Firefox installed on it, log in and do a gpupdate /force with the end result being those Extensions magically appearing as per the below image.

Hope that helps.

Reset the Default Domain and Domain Controller Group Policy Objects to their out of box state

So, I recently inherited a small client with SBS 2011 and their previous IT admin only ever used the Default Domain Policy to apply computer and users settings (such as mapped drives and printers). Microsoft has quite a strong recommendation of best practice for the two policies which goes along the lines of;

  • Default Domain Policy GPO should only be used to manage the default Account Policies settings, Password Policy, Account Lockout Policy, and Kerberos Policy.
  • Default Domain Controllers Policy GPO should only be used to set user rights and audit policies.

So I first needed to create separate GPOs to store these custom settings and then a way to clear out all of those changes and revert them back to their default state.  So how do you go about reversing the damage if you don’t have backups far enough? In comes a small utility called dcgpofix which resets these two Group Policy Objects to their default settings. Launch an admin command prompt window and run the following command;

dcgpofix /target:both

Once executed it will confirm you want to restore them to their out of box defaults, which we can confirm with a couple of Y responses and then bang they should be restored, see the screen shot for an example of it running in my test lab.

Remote Desktop is Blocked in Windows Firewall even though Group Policy Setting is set to allow

So I’m going through and trying to automate a lot of things in our environment (one thing you should always try and do as a SysAdmin is to automate repetitive tasks) and to help me achieve this I’m using Group Policy, step one is enable Remote Desktop to all of our Servers automatically. Created the Group Policy Object, allowed Remote Desktop Connections and also setup a list of IP Addresses to allow connections from.

After a while I added another IP Address to the exemptions and the next morning I found that I was no longer able to RDP directly to some of my servers, wondering what had happened I logged into our Hyper-V host (where RDP was still working) and I logged onto one of the affected servers. I firstly went and checked to ensure that RDP was still enabled, yup sure is, I then went and checked the Firewall and I spotted a Block and Deny All rule that I was sure I didn’t create. So I went back over the GPO that I had applied, went into the IP exceptions and turns out there was a SPACE separating one of the IP Addresses after the comma. Removed that space, performed a GPUpdate on the affected machines and Remote Desktop started working again.


Specify ClickView Server IP settings via the Registry using Group Policy with an ADMX Template

So I was recently going through our Group Policy and found that we were applying a reg file to specify the Server IP for our ClickView Players.  I don’t really like this approach anymore and tend to try and have everything nice and neat so I set about creating a ADM file to store the setting, I also wanted the ability to disable the School Bag feature for our Labs.

Whilst creating the file I relied on the Language Reference for Administrative Templates on MSDN.  I find it much quicker to build it in Notepad with old Syntax then to go around making an XML based ADMX file.

Once I was done, I then got my hands on Microsoft’s free ADMX Migrator (download here) and used it to convert my ADM file.  After a quick clean up, imported them into one of our Domain Controllers and I was then able to manage our ClickView Player a little easier and without having to rely on a reg file. You can download the ADM/ADMX for your Group Policy store below.

ClickView Group Policy ADMX .

Hope that makes life easier for someone.

Wireless Projection / Miracast option disappears from Microsoft Surface Pro 3 / Windows 8.1 after joining a Active Directory Domain

We recently deployed some Microsoft Surface Pro 3s (love these devices) for our Executive team along with some new equipment in meeting / board rooms with Wireless Display capabilities. During testing with my personal SP3 (not domain joined) the wireless display worked a treat, so I expected it to work fine on the ones we would be deploying.

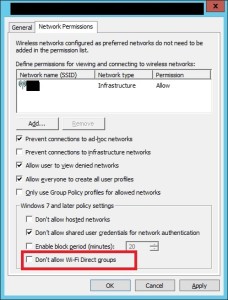
After about a week, one of the managers shot me an e-mail saying he couldn’t see the option for wireless display, that night he had performed a reset of the device, came in and had the option, but once we joined it back to the domain, it disappeared. I started digging around Group Policy to see what was causing it to disappear and found that these devices were getting an old “XP” based Wireless Network Policy.  I upgraded the policy which then gave us some extra options, including allowing / disallowing Wi-Fi Direct.upgraded policy

Computer Configuration > Policies > Windows Settings >Security Settings > Wireless Network (IEEE 802.11) Policies

The setting Don’t allow Wi-Fi Direct groups which needs to be disabled can be found under the “Network Permissions” tab. From what I can see, any Wireless policy configured for XP doesn’t have this option and a machine will simply disallow it.

How is Miracast or WiDi related to Wi-Fi Direct?  Well basically Wi-Fi Direct allows devices to connect directly to each other, without the need for a Wi-Fi AP, which is exactly what your surface is doing when attempting to stream the display straight to a TV / Projector.

Once we had this option turned off, ran a gpupdate on the machine and viola, wireless display showed up and began working.


Deploying printers via Group Policy and getting them pushed out the right way as well as solving driver installation issues (0x80070bcb Specified printer driver was not found and needs to be downloaded)

So we recently upgraded our printing infrastructure with a whole new lot of printers and software (along with a shiny new version of PaperCut MF) and have implemented a global queue or better known as Follow Me Printing.  So how do we go about pushing out all the new global printers to our users.  Well along with the 50 other projects we have on the go, one of them is a clean up of our group policy, so after removing around 15 GPOs related to our old printers I got to work.

So for starters I’ve created a GPO which will contain all of our Follow Me Printing settings, including deploying the PaperCut Client and Global Queue Printers. In our environment we have a mix of Windows XP, Windows Vista and Windows 7 which will all handle printers being deployed via Group Policy differently (Microsoft make things so easy, don’t they).  For XP, things are simple, simply add the printer to be deployed either by user or computer preference under control panel > printers. For Vista and 7 however this is where it gets tricky.  If you are using a driver which has been loaded on the machine before, the printer will deploy, otherwise you will receive an error in the event log such as the following:

The user 'Printer Name Here' preference item in the 'Group Policy Object
{GUID-GOES-HERE}' Group Policy object did not apply because it failed with
error code '0x80070bcb The specified printer driver was not found on the system
and needs to be downloaded.' This error was suppressed.

This basically means that the client couldn’t download the driver, but the real reason is because of UAC and the computer not requesting permission to install a driver. Thankfully there is a Policy that we can enable that will allow us to set the permission requirements during printer driver installation.

Using the Point and Print Restrictions Policy we can enable printer driver installation without it getting hassled by UAC. Under Windows Vista it is a User Policy and on Windows 7 it is a Computer Policy (I have both enabled for good measure). So enable toe Point and Print Restrictions Policy and change the following options:

  • When installing drivers for a new connection: Do not show warning or elevation prompt
  • When updating drivers for an existing connection: Show warning only

Once we have configured the Point and Print Restrictions Policy printers will download and install on any client computer that the Object is targeting.

Hope that helps a few people out when setting up and configuring their Group Policy Printer Distribution, any queries please comment.

Assigning resources via logon script based on computer names.

We’ve recently been having an issue where printers being deployed via group policy haven’t been deploying, or are deploying but not being set to default.  So after some investigation, the easiest thing to do would be to write a Visual basic script to ease the deployment of printers throughout our environment. Luckily for us we have naming conventions and machines are usually called 2011uname or 2014uname, based on a student’s final year.

You can use this script for all sorts of things, from allocating printers and mapping network drives. To increase or decrease the amount of characters that the script looks at simply modify the strLength (Define String Check Length) variable at the beginning of the script.

'Actions based on Computer name for logon scripts
'Define String Check Length
strLength = "4"

'Get the computer name
Set WSHNetwork = CreateObject("WScript.Network")
strComputer = WSHNetwork.ComputerName

'Select year level by ending year
Select Case Left(strComputer,strLength)
    Case "2011"
        msgbox "year 12"
    Case "2012"
        msgbox "year 11"
    Case "2013"
        msgbox "year 10"
End Select

The script will print out a message box, but within the case you can specify what ever action you want. Hope that helps someone out.