Power BI Gateway SSL Issues with managed AWS RDS SQL Server instances

I had a customer call up and explain their Power BI reports had stopped working, they’re not managed so after working a few things out we got to work and jumped into their Datawarehouse environment in AWS. After a quick look we could see that their RDS SQL Server instance had TLS turned on and that no one had managed or bothered to rotate the certificate which had now expired. This is a very quick and painless process (since it’s a managed instance) and simply requires a reboot. Once loaded, refreshing a report would result in an error of Something went wrong, and looking in the details we could see The certificate chain was issued by an authority that is not trusted.

You also need to ensure to load the AWS RDS Root certificates onto their Power BI Gateway and Reporting server, downloading them from AWS here and then loading them into the trusted certificate authority in the Windows Certificate store. Once done, we could see reports refreshing and pulling data as expected.
Moral of the story? Just because it’s managed doesn’t mean it’s set and forget…

Queries for troubleshooting the Database Mail (dbmail) function of Microsoft SQL Server

So just a quick one today. I was recently working on a SQL Server, running through some Database Mail setup and testing (see Microsoft Docs) with one of our applications.  I needed a way to see what e-mails were being sent out as well as what wasn’t.  The below queries will give you the info I was after, the first one shows any items that have run through DB Mail and their details for the last day (you can customise the WHERE statement to your needs.  You will want to run them against MSDB, do this by selecting it or issuing a USE MSDB statement.

SELECT p.name, i.send_request_date, i.sent_date, i.recipients, i.subject, i.body
FROM sysmail_mailitems AS i inner join sysmail_profile as p on p.profile_id = i.profile_id
WHERE sent_date > DATEADD(DAY, -1,GETDATE())

Bare in mind that I’m using Aliases to shorten the query a little (see this article).  Now this next one simply shows failed items as well as error responses if any from a mail server.

SELECT i.subject, i.recipients, i.copy_recipients, i.blind_copy_recipients, i.last_mod_date, l.description
FROM sysmail_failedi AS i LEFT OUTER JOIN sysmail_event_log AS l ON i.mailitem_id = l.mailitem_id
WHERE (i.last_mod_date > DATEADD(DAY, - 1, GETDATE()))

Hope that helps.

Moving the SQL Server tempdb file location after SQL Server is installed

Working with one of my education customers I recently had to perform some maintenance on their SQL Database server as they were running low on disk space AND had a free unused virtual disk where we could throw their tempdb onto (it was meant to go here but they didn’t place it there during installation). So I had the task of moving it over.

First step is to get an as-is of where tempdb currently is and how many fragments there are; Open up SQL Management Studio and run the following query.

-- Lists all current tempdb files and their paths
SELECT name, physical_name AS CurrentLocation 
FROM sys.master_files 
WHERE database_id = DB_ID (N'tempdb');
GO

Now that we have a listing (similar to our screenshot above/left), we then need to build up a query to move the database files from one drive to another. It should look something similar to the below query, changing paths and adding/removing tempdb fragments as needed (simply add more alter database statements for each file node).

USE master;
GO
ALTER DATABASE tempdb
MODIFY FILE (NAME = tempdev, FILENAME = 'F:\MSSQL14.MSSQLSERVER\MSSQL\DATA\tempdb.mdf');
GO
ALTER DATABASE tempdb
MODIFY FILE (NAME = templog, FILENAME = 'F:\MSSQL14.MSSQLSERVER\MSSQL\DATA\templog.ldf');
GO
ALTER DATABASE tempdb
MODIFY FILE (NAME = temp2, FILENAME = 'F:\MSSQL14.MSSQLSERVER\MSSQL\DATA\tempdb_mssql_2.ndf');
GO
ALTER DATABASE tempdb
MODIFY FILE (NAME = temp3, FILENAME = 'F:\MSSQL14.MSSQLSERVER\MSSQL\DATA\tempdb_mssql_3.ndf');
GO

In the above example we have specified F drive.  The other thing to note is that if you have SQL Server running through a service account, that will need NTFS modify permissions to the destination.  Once that is executed under the Master database context the files will then be re-created on the next SQL Server service restart.

How to easily Check your SPN and Delegation settings for SQL Server in an Active Directory environment

I was recently setting up some Linked SQL Servers for a customer to perform queries against a database on one server through another. One of the things you need to get right when setting up linked servers when using Service accounts in Active Directory is SPNs (or Service Principal Names) and Authority to Delegate (for Kerberos authentication) which can sometimes be quite cumbersome through ADUC or ADSI edit.

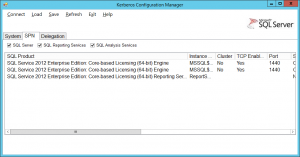
I then stumbled upon a little tool from Microsoft called the Microsoft Kerberos Configuration Manager for SQL Server. Running this little tool on the two SQL servers I could quickly and more easily see the SPNs (see picture to the right) and Delegation permissions.  As one server was quite old (and before my time) I could easily see that the SPNs configured for that particular service account were incorrect and the tool even allows you to fix this by generating the correct SPN. Hope that helps save some time in the future.

Fixing SQL Reporting Services The URL has already been reserved error during Configuration

I was recently helping out a colleague with an SQL Server Reporting Services (SSRS) installation. When it came time to configuring that instance of SSRS and making it listen on port 80 for that particular site we got The URL has already been reserved warning message, navigating to the Reporting Services URLs gives us a HTTP 500 error message.

To find the culprit I can usually use netstat -ab to find what windows process is listening on particular ports but for this instance it was simply SYSTEM, this usually means that an application is using the HTTP.SYS driver to directly listen for requests. So to work around this and find out what has bound to those ports, we use netsh http show urlacl and when I ran it on this server, I could see that ReportServer had already been enabled on Port 80.

   Reserved URL            : http://+:80/ReportServer/
       User: NT SERVICE\ReportServer
           Listen: Yes
           Delegate: No
           SDDL: D:(A;;GX;;;S-1-5-80-2885764129-887777008-271615777-1216005580-2722851051)
   Reserved URL            : http://+:80/
       User: NT SERVICE\ReportServer
           Listen: Yes
           Delegate: No
           SDDL: D:(A;;GX;;;S-1-5-80-2885764129-887777008-271615777-1216005580-2722851051)

I’ll show you two ways to remove these entries that have been incorrectly configured. The first is using the following command

netsh http delete urlacl http://+:80/ReportServer/

A much easier way I’ve found is to use a tool called HttpCfg.exe written by Steve Johnson which is based on a tool from MS (now obsolete). I’ve got this in my toolbox for the future, but simply open the tool, select the entry and hit delete.

Now we can re-run the SSRS Web server configuration and hit apply which should succeeded this time.

Changing the SQL Server Collation After Installation for SQL Server 2012 or 2014 without re-installation

So I was asked recently to setup a test environment for one of our CRM applications. So I went ahead and instead of copying the existing Virtual Machine I decided to create a new one from scratch. Installed SQL Server 2012 and the required application files. As I went to install the database onto the SQL server I had realised that I selected the wrong server database collation during installation (I chose SQL_Latin1_General_CI_AI). I’ve known in the past with 2008 / 2008 R2 I needed to uninstall and reinstall to change the Server Collation. This is no longer the case with SQL Server 2012 or 2014.

After going over the documentation of the software, I needed a Server Collation of SQL_Latin1_General_CP1_CI_AI. I’ll make a couple of recommendations with this method, if you already have databases mounted, back them up, then remove them (as this speeds up the process a fair bit if you have DBs with heaps of rows and indexes). Not sure how supported this is by Microsoft, I’m doing this in an environment where even though it is live data, it isn’t critical.

Anyway, moving on. Firstly, shutdown any SQL Server services that are running and then fire up an Administrative command prompt window and go to the SQL Server Binn directory. Once there, we will issue the following command (you can replace the collation with which ever you need)

sqlservr -m -T4022 -T3659 -s"MSSQLSERVER" -q "SQL_Latin1_General_CP1_CI_AI"

The command above, launches a single user admin mode to connect to the SQL Server -m, enables Trace mode using -t. We specify the instance with -S and set the collation with -q. This will run through the motions and then notify you that the operation has completed and that no user action is required (so close off the window). Start up any SQL services we killed off earlier and the databases will now have the correct Collation (restore if required).

How to Rename a SharePoint 2013 Content database name hosted on SQL Server

Dismounting and Renaming a SharePoint DatabaseSo I’ve been toying with SharePoint 2013 in my lab at home, doing the install and configuration at the moment, setting up my first Site after the initial configuration but noticed that I made a typo in the Database name.  So how do I go about fixing or renaming that database in SharePoint and in SQL Server.

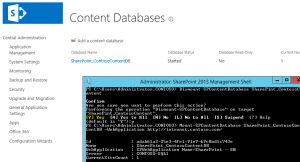
First thing first is we need to know the name of the Content database, in my case it is easy, because we only have one and I can easily see the spelling mistake I made. But if you need to work out the name of the Database, you can look in Application Management > Manage Content Databases and click on the Site Collection you are after; alternatively you can use SharePoint’s management shell and issue the following two cmdlet’s;

Get-SPWebApplication | Select-Object Url, ContentDatabases | Format-List

What sites are using this content database;

Get-SPContentDatabase | Where-Object {$_.Name -eq "SharePint_ContosoContent"} | Select-Object Sites | Format-List

So now we know the name of our content database, we need dismount it before we can rename it in SQL Server. To dismount use the following cmdlet;

Dismount-SPContentDatabase SharePint_ContosoContent

Now the database is ready to rename.  Open up SQL Management Studio and connect to your Database Server hosting SharePoint.  Now usually when you go to rename a database you will get an error message stating that the database is in use.  To get around that we turn our database into Single User mode, rename it and then set it back to multi user mode with the following SQL snippet.

USER Master
-- Set to Single User to prevent unable to lock out
ALTER DATABASE SharePint_ContosoContentDB SET SINGLE_USER WITH ROLLBACK IMMEDIATE
-- Rename Database
ALTER DATABASE SharePint_ContosoContentDB MODIFY NAME = [SharePoint_ContosoContentDB]
-- Set back to multi user for production use
ALTER DATABASE SharePoint_ContosoContentDB SET MULTI_USER

Now once we have renamed the database on our SQL Server, it is time to mount it back onto SharePoint, we do that by issuing the following PowerShell on our SharePoint server

Mount-SPContentDatabase SharePoint_ContosoContentDB -WebApplication http://intranet.contoso.com/

And there you have it, renaming a SharePoint content database if you make a typo like me.

Changing the recovery mode doesn’t shrink an SQL Database log file, how to shrink logs manually.

So I found out recently that one of our servers was running out of space.  It’s our AV server so I was like what the hell, why is it running out.  Turns out it had an instance of SQL Server on there as a quarantine and configuration database.  The Virtual Machine was being backed up but not the database itself therefore no log back ups and log truncates after that.

To check exactly how much space the logs are taking up you can run the following SQL cmd:

SELECT * FROM <database>.sys.sysfiles

Or you could just as easily right-click the database and check file sizes from there.

To fix this I simply changed the recovery mode from FULL to Simple for the databases, but without a backup of the databases themselves the logs wouldn’t truncate.  Doing a backup from the right-click menu won’t truncate them either.  Since I wasn’t really worried about backing up the database itself I could just force SQL Server to truncate the logs.  I ran the following command to shrink the log file:

DBCC SHRINKFILE('<database_log>')

With <database_log> being the name of the database log file you want to shrink.  That solves that problem.

Setting up an SPN and fixing the cannot verify the service principal name error when installing ForeFront Endpoint Protection

We are currently in the process of trailing Forefront Endpoint Security along with our SCCM Deployment.  So after a few weeks of tweaking we have got our systems center deployment to a level where we are happy with it, it was time to begin installing and testing Forefront.

After beginning our installing and answering a few questions the setup begins to validate some per-requisites. Apart from having reporting services installed and configured on a SQL Server you also need to have the service account for SQL Server to be publishing its existence via a Service Principal Name or SPN. If the account doesn’t have a valid SPN entry then you will receive the following message during the per-requisites check of the Forefront setup.

Setup cannot verify the service principal name (SPN) for this account.
Ensure that there is a single valid SPN entry for this account in the
Active Directory Domain Services.

So how do we go about adding an SPN entry. We will use sqlservice as our user account. We can either do this via ADSIedit or the command prompt. Open up an elevated command prompt and enter the following command:

setspn -a MSSQLSvc/sqlserver.fqdn domain\sqlservice

with MSSQLSvc being the protocol, sqlserver the name of the Server hosting SQL Services along with your fully qualified domain name and finally the account you wish to add the SPN entry for. To check that you have successfully added the spn you can do the following:

setspn -l domain\sqlservice

which will list the account along with SPNs being advertised for that particular account.

The quicker way would be to run ADSIedit, find the account you wish to add the SPN for, right click and go properties and then under the attribute editor. From there navigate down the list until you find servicePrincipalName and click edit. You can then enter the SPN in the same format as above, which is:

MSSQLSvc/sqlserver.fqdn

And there you have it, you can continue to install Forefront without any issues so long as you meet the other requirements of the setup.

Moving your SUSDB when it is running under MSDE

During my morning rounds of looking after clients’ servers, running SBS 2008. I noticed one was running out of space.  It had recently been updated to WSUS 3.0 SP2, after doing a quick hard drive space check I found that SUSDB was over five gigabytes in size. Generally this database should be around one gig.  Until I had some time to investigate I thought the best thing to do was to move it to another hard drive, easier said than done.

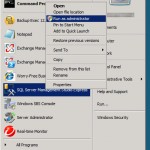
Just a little tip, if you are running under Windows SBS 2008 then you will need to Run as Administratorwill need to run the Management Studio as an Administrative user by right clicking and selecting “Run as Administrator”. This will allow you to connect to the Internal Database as your SBS Admin user doesn’t have permission to do so.

Once the logon screen appears, your first thought would be to simply select the Microsoft##SSEE instance seeing as that is what the internal database is called but it still won’t connect. You need to connect via named pipes. Do so by typing the following into the server name field:
\\.\pipe\MSSQL$MICROSOFT##SSEE\sql\query
Once connected you should be able to SUSDB under the Databases list.  To move the database is quite simple, we will detach, move the database files and then re-attach the database. Best to stop the Update Services Service before continuing (via the Services Snap-In).

Detach Database DialogOnce in Management Studio, expand Databases and right click on the SUSDB database. From there click on Tasks and select ‘Detach…’ a dialog window will pop up. We will want to ensure that SQL Server drops any connections to the database to ensure a successful detachment of the database, so tick ‘Drop Connections’. Once the process is complete, minimise the Management Studio and navigate to the databases location (usually under ‘c:\wsus\SUSDB’) and move the folder to a location with more space.

Once that is done, we can re-attach the database. Maximise the Management Studio and right click on Databases and select ‘Attach…’. From here you are presented with another dialog box, click on the Add button and select the new location of the SUSDB that we just moved. Once you have selected the database simply click on Ok and SQL Server will do the rest.

Start the Update Services service and WSUS should be fine and work just as it was before the move.