Bad Image Error when installing CrowdStrike sensor on Amazon WorkSpaces

Long time since I’ve posted – I promise I’ve been very busy with life.

I was recently assisting a customer with a CrowdStrike Falcon Sensor deployment and we were in the process of updating the gold images in their VDI platform, Amazon WorkSpaces.  CrowdStrike have a nice installation document on their website that you can follow to get the sensor deployed.  After going through the process (starting from about page 10 since we already have WorkSpaces and using the yearly billing option), we deployed the sensor with the following parameters, with the NO_START being important so that the sensor doesn’t imprint IDs (similar to most other cloud managed tooling).

WindowsSensor.exe /install /norestart CID=<falcon id here> NoFA=1 NoDC=1 NO_START=1

After executing and the progress bar getting about half way, we ended up encountering an error. CSFalconServiceUninstallTool_x64.exe – Bad Image relating to spacedeskHookUmode.dll  Reading up in the CrowdStrike support portal, the error usually relates to Citrix or some sort of DLP protection triggering, however we had neither operating in the VDI environment.

After some further digging, we found a PDF on the Amazon site and found that the culprit is actually part of Amazon WorkSpaces, as the dll file provides the ability to use Web Access.  In our use case, we don’t use this so simply set the following registry keys to disable web access in the image.

HKEY_LOCAL_MACHINE\SOFTWARE\Amazon\WorkSpacesConfig\update-webaccess.ps1

Set the RebootCount DWORD to 1

HKEY_LOCAL_MACHINE\SYSTEM\CurrentControlSet\Services\spacedeskHookKmode

Set the Start DWRORD to 4

Once done, we rebooted and then had a successful sensor install.

Hope that helps.
Add AWS CLI to Windows Terminal

I am a fan of Windows Terminal and some of the recent things Microsoft seem to be doing for SysAdmins. I like having all the tools I need in a single spot. Adding the AWS CLI is fairly straight forward but makes life a heap easier.  Start by installing Python from python.org if you don’t already have it on your machine. Once installed (take note of the version, which as of publishing is 3.11) open up Windows Terminal.

Now let’s install AWS Shell using Python, enter the following command

pip install aws-shell

once that completes we will need to locate the aws-shell executable, for quick reference it resides under the user profile like follows Note that Python311 will change depending on the version you have installed.

C:\Users\John\AppData\Local\Programs\Python\Python311\Scripts\aws-shell.exe

We can also use PowerShell to quickly search for it using the following command

(Get-command aws-shell).Path

Now that we have the location, we can begin to configure Windows Terminal. Go into settings from the drop-down menu and under the Profiles section, select Add a new Profile now drop down pick a console that you like and let’s duplicate it (we’ll use PowerShell).

Under Name, enter a better name, such as AWS Shell. For Command Line, enter the path of the aws-shell executable we found earlier. Starting Directory is fine as-is (it isn’t really used). For an icon, you can grab it from this file aws_icon.zip , paste it into the same location as aws-shell and browse to it. You can also customise the appearance and add a background image or change colours as you see fit. You can see an example JSON profile here.

        {
            "name": "AWS Shell",
            "commandline": "C:\\Users\\John\\AppData\\Local\\Programs\\Python\\Python311\\Scripts\\aws-shell.exe",
            "icon" : "C:\\Users\\John\\AppData\\Local\\Programs\\Python\\Python311\\Scripts\\aws-logo.ico",
            "acrylicOpacity" : 0.90,
            "fontFace": "Consolas"
        }

If you decide that you need to edit the JSON file directly, keep in mind that you need to escape special JSON characters, which includes a backslash. You need to escape a single backslash with double backslash.

Hide the Bing button in Edge

I’m not a fan of the Bing button that now appears in Edge. Microsoft seem to have rushed it out as there isn’t an easy way to remove it. We’ll do this via a registry key (that can also be deployed via Group Policy)

Close out of Microsoft Edge completely and open the Registry Editor and navigate to HKEY_LOCAL_MACHINE\SOFTWARE\Policies\Microsoft. Right-click on the Microsoft folder and select New > Key from the context menu to create a new Key and name it Edge. Enter the Edge folder and then right-click an empty area on the right and choose New> Dword (32-bit) value, name this value HubsSidebarEnabled . Its default value is 0, which is correct. Now close Regedit and open Microsoft Edge again and navigate to edge://policy and click on the Reload Policies button that appears – the button should disappear.

As of Edge version 114 (Edge Dev Channel) users can do this via Edge settings and navigate to Sidebar > App and notification settings > Discover and then Disable the Show Discover toggle at the top.

Adopt Unifi Access Point over Internet or VPN using SSH

If you’ve shipped some Ubiquiti Unifi Wireless access points to a remote site before adopting them or happen to have your controller on another network, you can log into them via SSH and point them to your Unifi controller. It performs discovery via basic L2 broadcast and DNS resolution of hostname unifi, if either of these methods do not reach a controller then you can follow these steps.

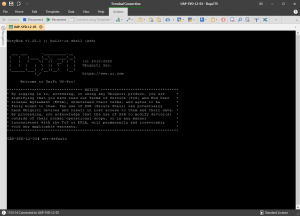
Get them powered on and then once the status led of your access point is steady white (or a steady amber for older Unifi access points) then that means it’s waiting for adoption. Grab the IP that was obtained via DHCP and then SSH into the Unifi access point using the default ubnt / ubnt username and password combo. If the AP was previously managed, then you’re going to need to get the username and password from the old controller which is under System Settings > Controller Configuration > Device SSH Authentication.

Once you log in, it will be best to perform a factory reset, so type in set-default to factory reset it first. Once the AP reboots you can then SSH back in and log in using the default username and password.  We can now use the following command to inform the AP of our controller

set-inform http://ip.or.fqdn.of.controller:8080/inform

Change the IP or FQDN of controller to the values appropriate for your network.  The unit will then reboot, you can reconnect via SSH and check it’s status by issuing a info which will display its status and whether it has connected to your controller.

Set a Default Tab for FortiClient EMS

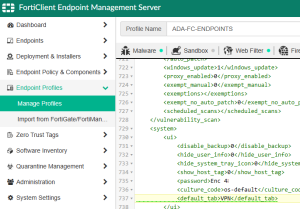
XML Editor in EMSIt’s been a while, but I am working on deploying an updated version of FortiClient for and company which is managed via EMS and InTune. One thing that bugs me (and many) is by default, the client UI will load into the Zero Trust Telemetry tab and the option to change the Default tab will be greyed out for the end user when managed. There is no UI setting in EMS but you can easily set the Default Tab by using the XML editor for the specific profile under Endpoint Profiles > Manage Profiles, edit the Profile and then select XML Configuration. Once there, hit Edit and add the following line under the System and UI tags.

<default_tab>VPN</default_tab>

You can also use any of the following values under the default_tab element to set the default tab accordingly.

AV: Antivirus
WF: Parental Control/Web Filtering
FW: Application Firewall
VPN: Remote Access
VULN: Vulnerability Scan

If you want to know what else you can configure via XML for the FortiClient via EMS, see the Fortinet FortiClient XML Guide here (or local mirror FortiClient_6.0.4_XML_Reference.pdf ).

Fixing Maximum connections reached by Clearing Connected Sessions on an APC UPS

I was trying to log into an APC UPS with the correct login but still received an error, The maximum number of web connections has been reached or simply Maximum connections reached. Knowing I had the right login credentials, and that no one else was logged into, I was a little perplexed.  There is a straight forward fix but can be a little annoying. 

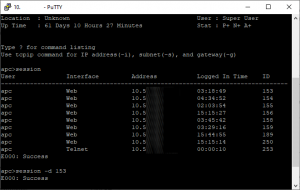
Open up your favorite SSH client and connect via SSH to the APC or Schneider Electric Network device. Login using the configured username or password, or default of apc and apc.  Once logged into the console, we’ll issue some commands to list the current sessions and then use the -d switch to “disconnect” a few. I’ll point out the last session via Telnet is usually you so don’t disconnect it.

session
session -d 153

Commands are based on the image, simply change the session number to suit. Once you have cleared all the commands, you should be able to login to the web interface without issues.

Automate Lets Encrypt Renewals using Certify the web on Windows with Atlassian Jira behind a Apache Reverse Proxy

So been a while since my last post. I’ve been recently pushing our machines into Azure as well as automating as much as possible. We’ve got an internal Jira instance that we use. It is still running totally on a VM with no fancy Azure PaaS features on it.

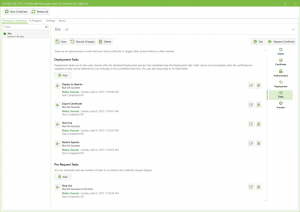
Certify the web Tasks break down I have a Lets Encrypt SSL certificate managed using Certify the Web. I am running the free and awesome Community Edition and have added a number of tasks to deploy the certificate to the Apache Reverse Proxy (we run other apps on the box) as well as into the Java Key Store (since we use the installer/bundled JRE that comes with Jira). Deploying to Apache is an in-built task and is easily added (as per the screenshot), but how about adding it to the Key Store of the Java Runtime Environment that is bundled with Jira? Well, a quick batch file with some commands to firstly delete (as you cannot replace) a certificate alias and then load our new certificate in as well as passing the store password and preventing the Trust this certificate message.

I came up with the following quick and dirty batch file that will update the certificate in the JRE Keystore (assuming all default paths and credentials).  Simply save it to a path (i.e. C:\Scripts) and an Export Certificate Deployment Task and then add a Run… Deployment Task pointing to the below Batch file.

CD C:\Atlassian\JIRA\jre\bin
keytool -delete -alias JiraLE -keystore ../lib/security/cacerts -noprompt -storepass changeit
keytool -importcert -noprompt -trustcacerts -alias JiraLE -file jira-le.cer -keystore ../lib/security/cacerts -storepass changeit

And there you have it, no Issues or Errors whilst trying to work with Jira every time your certificate renews.

Queries for troubleshooting the Database Mail (dbmail) function of Microsoft SQL Server

So just a quick one today. I was recently working on a SQL Server, running through some Database Mail setup and testing (see Microsoft Docs) with one of our applications.  I needed a way to see what e-mails were being sent out as well as what wasn’t.  The below queries will give you the info I was after, the first one shows any items that have run through DB Mail and their details for the last day (you can customise the WHERE statement to your needs.  You will want to run them against MSDB, do this by selecting it or issuing a USE MSDB statement.

SELECT p.name, i.send_request_date, i.sent_date, i.recipients, i.subject, i.body
FROM sysmail_mailitems AS i inner join sysmail_profile as p on p.profile_id = i.profile_id
WHERE sent_date > DATEADD(DAY, -1,GETDATE())

Bare in mind that I’m using Aliases to shorten the query a little (see this article).  Now this next one simply shows failed items as well as error responses if any from a mail server.

SELECT i.subject, i.recipients, i.copy_recipients, i.blind_copy_recipients, i.last_mod_date, l.description
FROM sysmail_failedi AS i LEFT OUTER JOIN sysmail_event_log AS l ON i.mailitem_id = l.mailitem_id
WHERE (i.last_mod_date > DATEADD(DAY, - 1, GETDATE()))

Hope that helps.

Get the last Reboot or Shutdown reason and user from the Windows Event Log

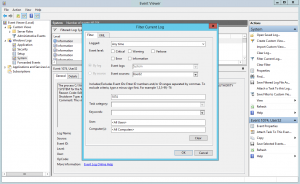
Start by going into Event Viewer (Windows+R or the Start Menu and type eventvwr.msc).  Navigate to the System Log under Windows, we then want to use Filter Current Log to allow us to only show Events with certain attributes (such as Source or IDs).

In our case, we want to filter on Event Source: USER32.  Then for Event IDs we want to see only 1074.  If you are after unexpected shutdowns, use 6008.  Once that’s in (like the pic on the right), click OK and this will filter the event log based on our requirements. You can scroll through and see what and who initiated a shutdown.

Enabling BitLocker with Group Policy and backing up Existing BitLocker recovery keys to Active Directory

So getting BitLocker enabled in an Active Directory environment is fairly painless and helps to get your end user devices more Secure.  I’ll outline the steps you need to take to enable it as well as get the recovery keys stored in Active Directory.  I’ll also dive into replicating this setup on Azure AD/Intune in a future post.

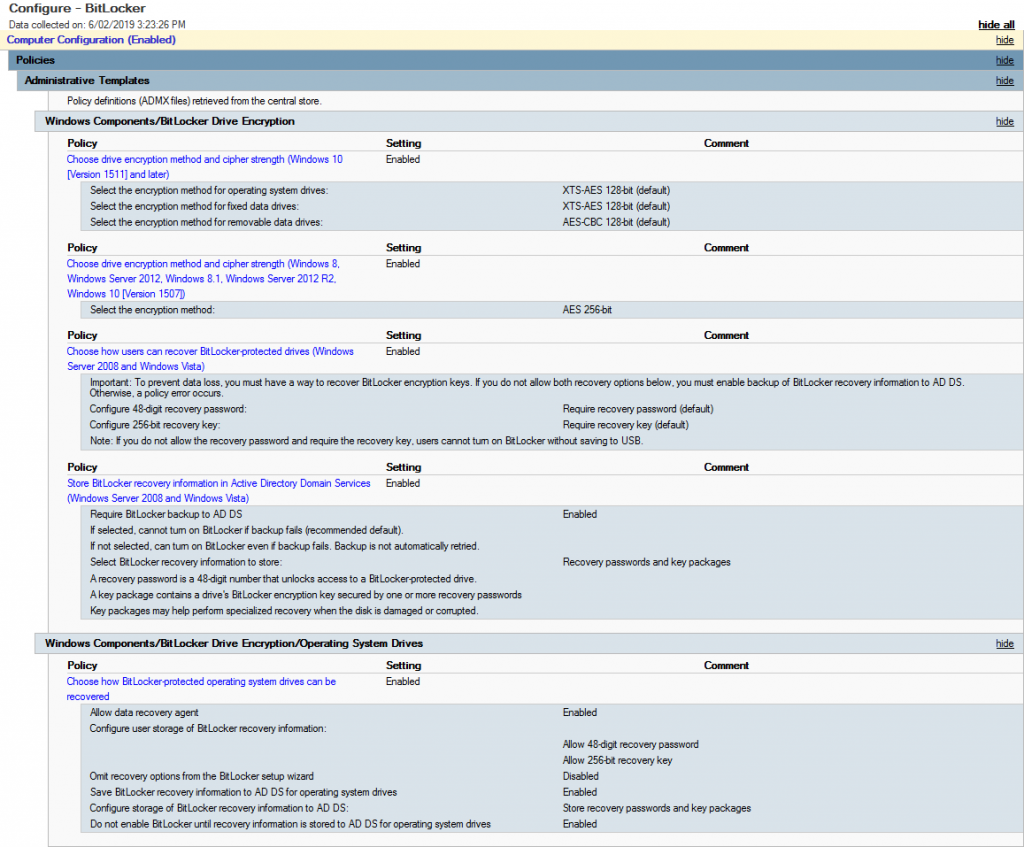
First thing is to create a new GPO (i.e. Configure – BitLocker) – Edit it and navigate to Policies > Administrative Templates > Windows Components > BitLocker Drive Encryption. Enable the following Options:

  • Choose drive encryption method and cipher strength (Windows 10 Version 1511 and later)
  • Choose drive encryption method and cipher strength (Server 2012, Win 8.1 etc…)
  • Choose how users can recover BitLocker protected drives
  • Store BitLocker recovery information in Active Directory Domain Services

Then go down one folder into Operating System Drives and enable the following:

  • Choose how BitLocker protected operationg system drives can be recovered

Once you’ve set this all up, it should look something similar to the image below.

Now target the GPO to some machines and if you’re running 1809 (from what I’ve discovered so far) or later you’ll notice them start the BitLocker process to encrypt automatically.  If not then you may need to check and ensure the TPM is enabled for the device (as we haven’t specified to encrypt devices without a TPM in this case).

What happens if you have already enabled BitLocker but now want to store the recovery keys in Active Directory? With this GPO set it will allow windows to write the recovery key to AD however we need to use the manage-bde utility, that is a command based utility that can be used to configure BitLocker

manage-bde -protectors -get c:
for /f "skip=4 tokens=2 delims=:" %%g in ('"manage-bde -protectors -get c:"') do set MyKey=%%g
echo %MyKey%
manage-bde -protectors -adbackup c: -id%MyKey%

I saved that as a batch file and ran that on the machines that had already been encrypted prior to rolling out the GPO.  Once run, it escrows the key into Active Directory.

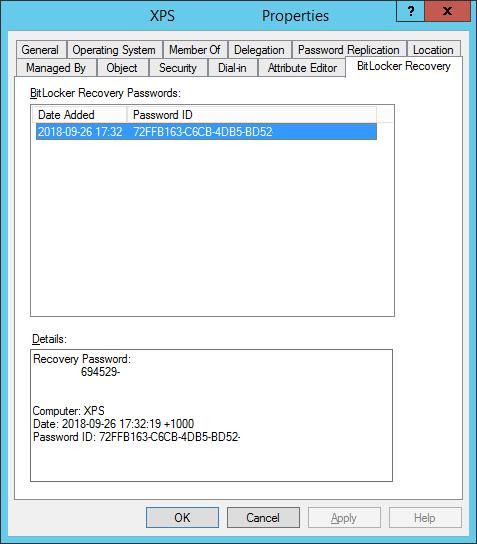
The last bit you will need to do so you can actually see the keys in the Properties tab or via the Search function in Active Directory Users and Computers, ensure that the BitLocker RSAT is enabled in Server Features and Roles.